This page has been fully written by
Domitille Bertin (Epita, AppingX-2020)
Christian Martins (Epita, AppingX-2020)
and validated by Thomas Broussard
What is Angular?
General purpose
Angular is a web front-end framework that helps developers building modern, responsive apps that work on a wide variety of platforms. Indeed, Angular can be used to build progressive web apps, which can be run on web browsers or as regular apps on smartphones (see Ionic framework or computers (see Electron framework ).
More precisely, Angular allows developers to build Single Page Applications (SPA). SPAs are essentially websites on which navigation does not require any page reloading when clicking on links. Google Maps is the perfect example of this concept. If a user types an address on the search bar, there is no page reloading, which would be critical for user experience. Instead, the current page is simply reorganized to show the requested information: map position changes, and the UI displays new relevant data etc.
Angular versions
In 2009, Google released the first version of AngularJS (note the «JS» suffix), which can be considered as Angular’s «big brother», Angular version 1. Later on, in 2016, Angular came out as the new version of AngularJS. This new major version was a complete change of paradigm and implied many breaking changes. One of them is the fact that Angular is written in TypeScript, which has become the officially supported language for the framework. Moreover, since Angular 2, an Angular CLI has been introduced allowing developers to manage dependencies, generating code, building and deploying their apps more easily.
As these lines a being written, AngularJS has been put under Long Term Support (LTS). This means Google no longer delivers new features, but only provides bug fixes. Meanwhile, there are still many projects running on AngularJS which have not upgraded to Angular. This is mainly because the gap between these two versions is too important and the cost of upgrading too high, particularly for larger projects.
TypeScript
TypeScript brings, among other features, strict typing and backwards-compatibility to regular JavaScript. While TypeScript is a programming language on its own, it is considered to be a superset of JavaScript because it is always eventually compiled to JavaScript.
Angular is built with TypeScript and developers are highly advised to use it, even if they could still use the framework with regular JavaScript.
Angular key paradigms
MVC pattern
The way Angular apps are built strongly relies on the Model-View-Controller (MVC) pattern and Angular makes it easy to implement.
- Model (Angular Service) In Angular, the Model is, in most cases referred as "Service". It is responsible for retrieving and managing data, from a REST API for example.
- View (Angular Templates) Angular terminology defines the View as a "Template". A template is basically HTML that displays data made available by the Controller (see below). Templates are often styled with CSS.
- Controller (Angular Component) Finally, the Controller (called "Component" in Angular), is responsible for orchestrating interaction between the Service and Template.
The fact that MVC separates the data logic (Model/Service) from the UI logic (View/Template) greatly improves maintainability, modularity and makes it easy to implement new features.
Just to make it clear, here is a recap of the Angular MVC terminology in a table.
| MVC concept | Angular equivalent | Purpose |
|---|---|---|
| Model | Transport (TypeScript) | Retrieves and manages data. Can communicate with a REST API. |
| View | Template | Displays data. Composed of HTML and CSS. |
| Controller | Component + Service | Map the user actions to backend features |
Concrete examples are provided later in this tutorial.
Dependency injection
Angular also relies on the Dependency Injection (DI) pattern and exposes its own internal system to manage it easily. Below is a simplified diagram of how DI works in Angular.
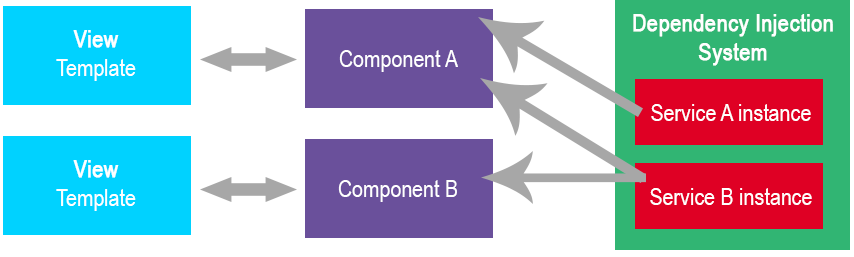
Classes usually need Dependencies to perform their job, which are, most of the time, Angular Services classes that provide data, and data management API s. The DI pattern states that it is the DI system that is responsible for instantiating the service classes once, rather than the dependent classes themselves.This works amazingly with the MVC pattern and makes the final app more efficient, modular, and maintainable.
REpresentational State Transfer (REST)
Most apps usually have two parts: a front-end (the app itself) and a back-end. The back-end stores and manages the data, it is invisible to the user. Usually, it is a server which can send data in an organized way and handle requests that modify this data. The front-end, on the other hand, is what the user sees: the interface he is presented with. The front-end displays data and forms that allow modifying this data. When the user validates his input, the front-end sends the modifications to the back-end, which saves it.
As a back-end, many Angular apps use REpresentational State Transfer (REST) APIs. REST is a software architecture that defines a set of rules (a norm) for managing Resources over a server. It is possible to build a REST API with any programming language that handles the HTTP protocol. Indeed, most REST API s communicate through HTTP, even though other protocols can be used as a replacement, like FTP. For this tutorial, we will consider that REST APIs solely rely on the HTTP protocol.
Basically, a REST API exposes interfaces on which actions can be made. A concrete example would be a student interface on a College student management server. Typically, this interface would exposed at an URL like https://epita.net/api/students on which the front-end could send requests with different HTTP methods like:
PUTto create a studentPOSTto modify a student’s informationDELETEto unregister a student that has left the School
Creating a student-management app
In the last part of this tutorial, we will create a student management app that :
- Displays students
- Allows editing students
We will cover, in a concrete way the concepts explained at the beginning of the tutorial.
Prerequisites
For this tutorial, you will need:
- NodeJS 8.x or 10.x installed Refer to the official website for installation guide.
- Angular CLI installed Run
npm i @angular/cli -g. - Your favorite Code editor Two great options are Visual Studio Code (free) and WebStorm (free for students).
- Our app’s back-end This tutorial provides you with a RESTful HTTP Server built for this tutorial with NodeJS and Express. Please download the given archive, extract it on your computer and run
node .at the root directory of that project. When navigating tohttp://localhost:3000/, you should get the following message:Server is up and running...
Note: this tutorial does not aim at teach you how to create a REST API but only how to use it with Angular. If you are interested on how to create a RESTful HTTP Server, the code is also provided, but not explained here.
Creating a new project
Initializing a project with the Angular CLI
Once you have got everything you need, open up a terminal, navigate to the directory you want you project to be in and run the following command:
ng new college-app
When asked to choose:
- Choose «yes» for Routing
- SCSS for CSS preprocessor
This command initializes a new project. The main folder we will work on is the src folder, which currently contains different files:
app.component.html: the main Template (View) of the appapp.component.scss: some CSS that styles the Templateapp.component.spec.ts: don’t mind about it for this tutorial, it is a function test scriptapp.component.ts: the Component (Controller) of our main Templateapp.module.ts: the root Module of the app
Cleaning the default template
Now that we have this ready, lets open the app.component.html Template and replace all of its content by:
<p>
    Hello World!
</p>
Serving the app with the Angular CLI
Check that everything is working fine, run the following command on your terminal:
ng serve
When «Compiles successfully» appears on the console, open your favorite browser and navigate to http://localhost:4200. At this point, you should get a webpage that displays «Hello World!».
Creating a Student Service
Generating a Service with the Angular CLI
The first thing we will is to create a StudentService that will fetch the students from our back-end server, our REST API. To do so, run the following command on your terminal:
ng generate service Student
This command generates a new empty Angular Service by creating a student.service.ts file. Let’s take a look at it.
import { Injectable } from '@angular/core';

@Injectable({
  providedIn: 'root'
})
export class StudentService {

  constructor() { }
}
Notice the @@Injectable@ annotation. It makes the StudentService class available for Dependency Injection. The providedIn metadata option specifies that the Service will be injectable through the root injector, which means the entire app in our case.
Creating a data Model
Our Service will manage students. From a programming point-of-view, this is a Model. In most apps, this would translate into a Student class that allows manipulating instances.However, for our example, we will simply create an IStudent that describes what our back-end server can send us.
Let’s create a Student.ts file inside the src/app folder of our project containing the following code.
export interface IStudent {
  id: number;
  firstName: string;
  lastName: string;
  age: number;
  grade: number;
}
Communicating over HTTP
Introduction
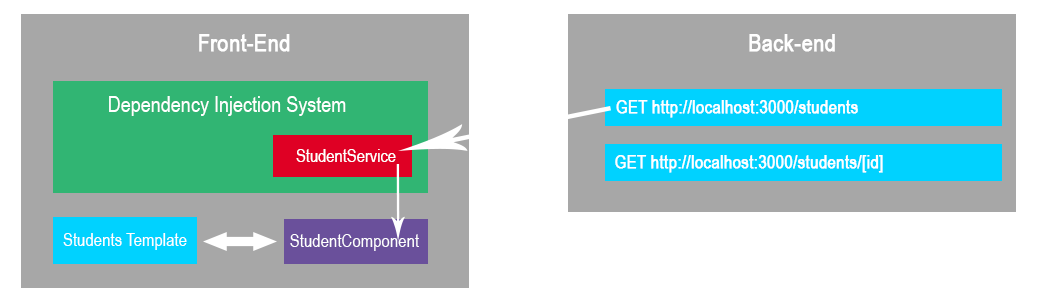
We want out StudentService to fetch the IStudent objects from the College server. Once the Service has got that data, all Components on which it will be injected into will be able to get the list of IStudent objects.
Below is a diagram that shows how our StudentService will interact.
Importing the HttpClientModule and injecting the HttpClient service
First, we need to import Angular’s HttpClientModule into our app. To do so, open the app.module.ts file, locate the imports array in the @@NgModule@ annotation and add HttpClientModule to it. This requires importing the symbol from @@angular/common/http@. Your file should look like so:
import { BrowserModule } from '@angular/platform-browser';
import { NgModule } from '@angular/core';

import { AppComponent } from './app.component';
import { HttpClientModule } from '@angular/common/http';

@NgModule({
  declarations: [
    AppComponent
  ],
  imports: [
    BrowserModule,
    HttpClientModule
  ],
  providers: [],
  bootstrap: [AppComponent]
})
export class AppModule { }
Now that the HttpClientModule is available in our app, we need to inject it inside the StudentService. To do so, change the Service’s constructor signature in the student.service.ts file:
constructor(private _httpClient: HttpClient) { }
By adding a private attribute of type HttpClient in the constructor’s signature, Angular knows that it needs to inject the service into our StudentService service. (Yeah, services can be injected in other services!)
Using the HttpClient service
Now that we have the HttpClient service available, let’s code a getStudents method that will use it to make a HTTP request to our back-end server in order to retrieve the list of all students.
public getStudents(): Observable<IStudent[]> {
  return this._httpClient.get<IStudent[]>('http://localhost:3000/students');
}
There are a few things that need to be discussed here:
- The return type of the method:
Observable<IStudent>The AngularHttpClientService relies on the Observer pattern. If you don’t know what it is, take a look at RxJS’s explanations about it. Basically, our Service will return anObservableobject on whichObservers will be able tosubscribe. When theObservablechanges, allObservers will be notified and take action. Here, the Observer will be an Angular Component, which will be notified when theStudentServiceretrieves the student list to display it to the user. - The
getmethod TheHttpClientService exposes different methods for performing different kinds of HTTP requests. Here, we want to perform a HTTPGETrequest to our server, that’s why we useHttpClient'sgetmethod. - The
getmethod argument Our back-end server is available onlocalhost:3000, hence the first argument of thegetmethod.
That’s it! Our StudentService is ready to fetch our Student list.
Creating a Students Component
Now that we have a Service to fetch all the students from our back-end server, we want to display it. Remember that in Angular, we use Components and Templates to display data. We are going to create a StudentsComponent and inject our StudentService. This way, the Component will be able to get the students and display it on our app.
Generate a Component with Angular CLI
To generate our component, run the following command:
ng generate component Students
This command creates a students directory inside the src/app folder.
Injecting and consuming the StudentService
First of all, we need to inject the StudentService we previously built into our new Component. To do so, open the students.component.ts file and modify its constructor prototype:
constructor(private _studentsService: StudentService) { }
Now Angular knows it has to inject the StudentService inside our StudentsComponent.
Our Component also need an attribute to store the list of students that will be fetched from the StudentService. Just add it in the class like so:
public students: IStudent[];
The next step is to Observe the Students list from the Service. To do so, we will subscribe to the Observable in the ngOninit method of our Component. Have a look at the following code.
ngOnInit() {
  this._studentsService
    .getStudents()
    .subscribe((students: IStudent[]) => this.students = students);
}
The Observable.subscribe method takes a callback that will be called when the students list has been fetched from the server. The list is then passed as the first argument to the callback, which will set our components internal students list.
At this point, your students.component.ts file should look like this:
import { Component, OnInit } from '@angular/core';
import {StudentService} from '../student.service';
import {IStudent} from '../Student';

@Component({
  selector: 'app-students',
  templateUrl: './students.component.html',
  styleUrls: ['./students.component.scss']
})
export class StudentsComponent implements OnInit {

  public students: IStudent[];

  constructor(private _studentsService: StudentService) { }

  ngOnInit() {
    this._studentsService
      .getStudents()
      .subscribe((students: IStudent[]) => {
        console.log(students);
        this.students = students;
      });
  }

}
Data binding from Component to Template
Now that our StudentsComponent retrieves data from our server through the StudentService, we need to display it in the View (Angular Template). To do so, open the students.component.html file and fill it with the following code:
<h2>Students list</h2>

<ul *ngIf="students && students.length > 0">
  <li *ngFor="let student of students">
    <strong>{{student.firstName}} {{student.lastName | uppercase}}</strong>
    <br>Age: {{student.age}}
    <br>Grade: {{student.grade}}/20
  </li>
</ul>

<p *ngIf="!students || !students.length">
  There are no students!
</p>
Many lines need explanations here.
<ul *ngIf="students && students.length > 0">Here we use thengIfdirective of Angular. What it does is that it only displays the element if the expression inside the quotes is true. Here thestudentsvariable refers to theStudentsComponent.studentsmethod, which is the list of students that is filled with the data received from our back-end server through theStudentService. If the list does not exist (resolves toundefined) or its length is0, then we don’t display theulelement.<li *ngFor="let student of students">Here is another Angular directive:ngFor. This acts as afor, iterates over all students in the list and creates anlielement for each one of them.<strong>{{student.firstName}} {{student.lastName | uppercase}}</strong>You may have noticed Angular’s interpolation mechanism on this line. What this does is evaluating and displaying whatever is inside of it. It is also possible to format the data using the|(pipe) operator. Here we use formatting to uppercase the students name.<p *ngIf="!students || !students.length">We usengIfonce again to display a message if there are no students (!students.lengthwhich is equivalent tostudents.length === 0in JavaScript) or if the students list has not been retrieved from the server yet (!students).
Using the app-student component
At this point, we have:
- A
StudentServiceService that retrieves a student list from a REST API - A
StudentsComponentComponent that observes the data from theStudentService - A Template that displays the data contained inside the
StudentsComponentComponent
Now the last thing we need to do is to use the use the consume the StudentsComponent we have created.
Let’s first go back to the students.component.ts file and notice line 6: selector: 'app-students',. This line declares the HTML tag of the Component. We must add a app-students tag to our app.component.html file to instantiate the StudentsComponent on our app. Let’s do so:
<app-students></app-students>
Save this file, run the ng serve command if needed, and navigate to http://localhost:4200 on your web browser.
You should obtain something like this:
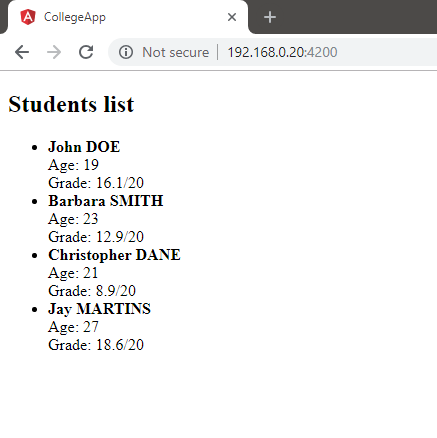
There it is! Our students list has been fetched from our back-end server and displayed on our app!
To go further
This is a very basic app that only displays data. A more serious app would obviously be more stylish and allow editing students, changing their grade etc. Take a deep look at the Official Angular Documentation to learn more and go further with this app!
Credits
- Domitille BERTIN (domitille.bertin@epita.fr)
- Christian MARTINS (christian.martins@epita.fr)
This tutorial has been made as an assignment for Mr. Thomas BROUSSARD.
EPITA APPING X 2 2020_