This page has been fully written by
Rubie de Oliveira (Epita, AppingX-2020)
Romain Sauvaire (Epita, AppingX-2020)
and validated by Thomas Broussard
Introduction
What’s an ORM ?
An ORM (Object/Relational Mapping) is a technique that allows you to query and manipulate data from any database using an object-oriented language.
It greatest feature is that it allows you to handle your database objects as if it was simple local objects. You don’t need to write complex SQL queries anymore!
Object-Relational Impedance Mismatch
Unfortunately, sometimes, it can happen that there is a mismatch between your relational object (in the database) and your object model (written in your favorite language).
It can happens for multiple reasons :
- Granularity : There are a different number of classes and tables
- Inheritance : Not supported by all types of relation databases
- Identity : Problem of primary keys not being the same
- Association : In relation model, association are handled via foreign key. Meanwhile, in object oriented languages, associations are unidirectionnal reference
- Navigation : In object oriented languages, we use associations to navigate through the object network, while in relational model, data can be navigated through via queries joining tables
JPA
Introduction
JPA stands for : "Java Persistence API".
JPA is considered to be the standard industry approach for object to relational mapping (ORM).
JPA is, just as J2E, just a specification. It’s just a set of interfaces which requires an implementation.
Persistence ?
For an object to be persistent, it has to lives on after the application is shut down.
In other words, it means the object has to be save in a database.
Spring Data JPA
To illustrate the power of an ORM, we will use Spring implementation of JPA : Spring Data JPA
Tools used
First of all, here’s a list of all the tools we will use in this tutorial :
- A Java IDE : We will use Intellij IDEA here
- Maven
- Spring Data JPA
- MySQL database
Setup
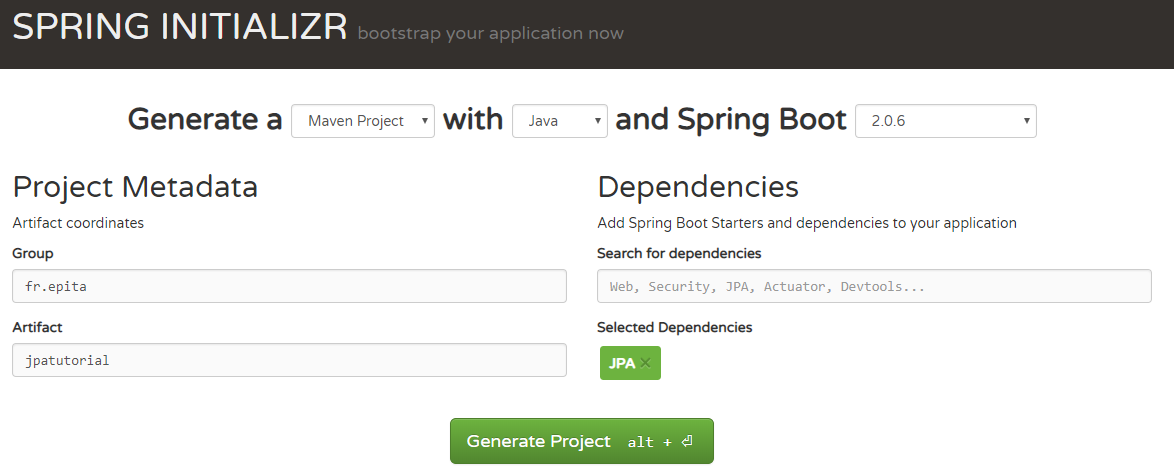
We will first create a new maven project with Spring Data JPA and Spring boot.
To do it, we will use Spring Initializr here. (which is embedded in Intellij IDEA Ultimate Edition)
Entity
Once our project is set up, we’re going to create our first entity.
To do so, we’re going to create a new package first, named entities, then a new Java class named Moto.
Then, have a look at this class :
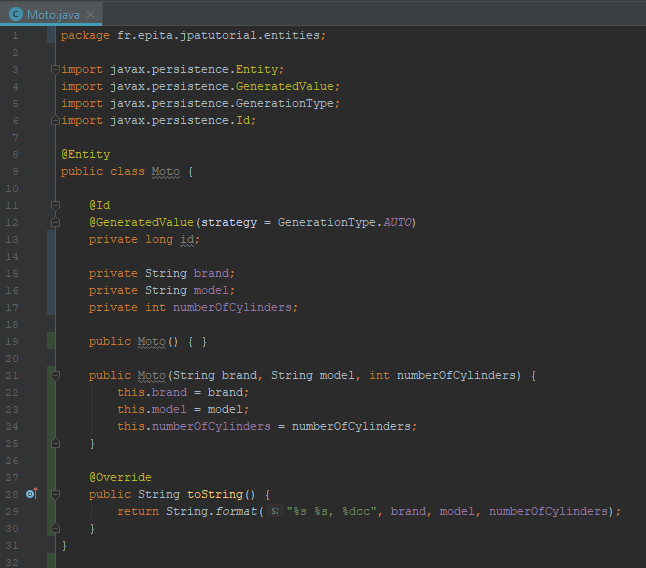
There is a lot of thing going on there! Let’s have a look at them one by one:
- @Entity : It’s Spring Data JPA annotation to tell this class is an entity and need to persist.
- @Id : Tells JPA that this attribute will be used as primary key in the Moto table.
- @GeneratedValue : Indicate that the id should be generated automatically
The other object’s properties (brand, model, ...) are not annotated because we want them to be mapped to columns that share the same name.
We can also see that :
- 2 constructors have been created (without and with all arguments)
- The toString() method have been overridden (this will be used later)
Repository
Next thing we need is a repository. We can see it as the Java representation of the database table, with all its data in it!
We will use this repository to insert, update and remove from the database table.
Let’s take a look at the interface, it’s pretty simple :
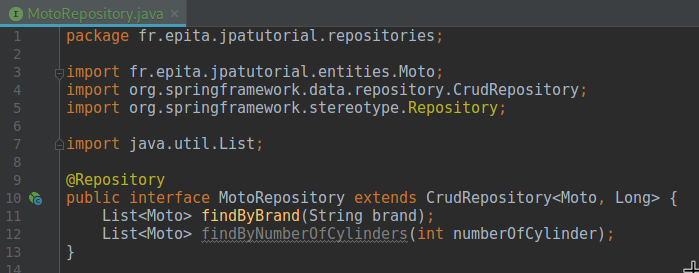
First of all, well, it’s an interface! Indeed, we don’t need to create a class here. Thus, this interface needs to extends CrudRepository<T, ID>. In our case, our T is the Moto class, and its ID is simply a Long.
Next, we can see the annotation "@Repository" which tells Spring that this is our repository we will use for the Moto class. Finally, we can see 2 methods signatures. We don’t have to implements them, Spring Data JPA will understand easily what we want to do here.
But we have to give it a hint :
- What does this query returns ? -> Here, a simple list
- What do we want our Motos to have ? -> Here 2 cases : Either a brand, or a number of cylinders
Application
If you take a look at your source root directory, you should see a file named 'JpaTutorialApplication.java'. It contains the main() method to launch your spring application.
We need to modify this class :
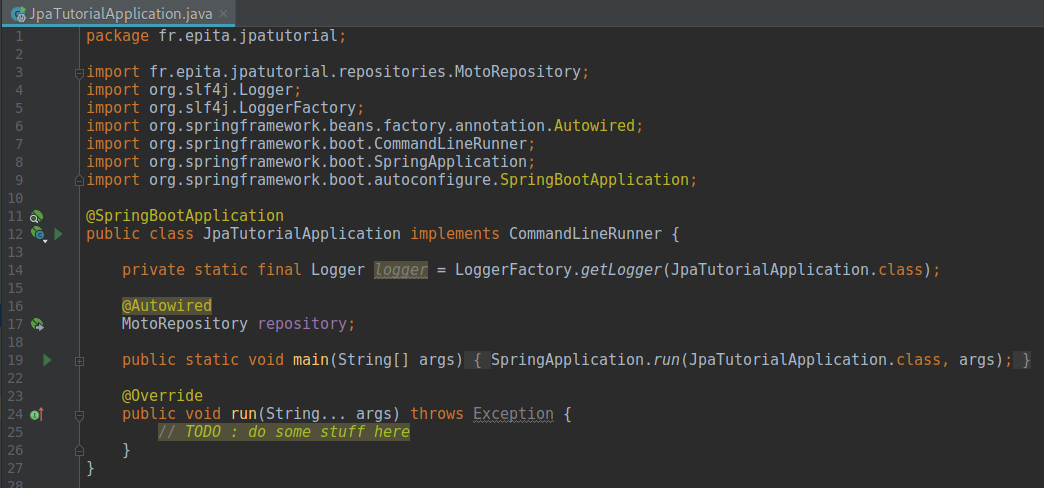
A lot of things are going on here! Let’s explain them:
- @SpringBootApplication : To simplify things, we use Spring Boot here.
- @Autowired : Mark the attribute repository to be injected by Spring dependency injection facilities, which means this attribute will be injected just after the construction of the bean. We want this because we need the repository to be available as soon as possible.
- logger : Spring uses a beautifully designed console logger, might as well use it, right ?
- CommandLineRunner : As you can see, our class implements the functional interface CommandLineRunner. We use it here to be able to launch some code right after our spring application is started, before it shuts down.
Using MotoRepository
Now that everything is set up, we can finally use our newly created repository!
Well, you must’ve guessed, we will code inside the run() function in our JpaTutorialApplication class.
First of all, we want to add some motorcycles to this repository. To do so, we will use the following code :

Then, we want to get all Yamaha motorcycles :

Let’s check the logger :

Everything is fine, we manage to print our motorcycles!
Persistence ?
What about persistence here ?
If I launch my Spring application, the repository gets 2 new motorcycles, but nothing is persistent here, it gets deleted everytime the Spring application is shut down.
Right, we need to connect our application to a database then ! Let’s use a simple MySQL database for this matter.
We won’t go in details about how to set up MySQL here.
From now on, every screenshot of the database will be taken from DataGrip
Once everything is set up, simply create a new database called 'jpatutorial'. If everything went well, you should have something like that :
![]()
Then, we have to tell our Spring application where this database is. To do so, we must edit the file 'src/resources/application.properties' :

spring.jpa.hibernate.ddl-auto : multiple possibilities here :
- none : No changes to the database structure (default)
- update : Database structure changes following our entities
- create : Create the database everytime but does not drop it
- create-drop : Create the database everytime and drop it when our Spring application is shut down
Now, launch your Spring application and let your code add new motorcycles to the repository.
When the application shuts down, look at your database :
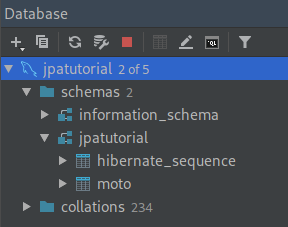
2 new tables have been created :
- hibernate_sequence : This table is used internally by Hibernate to generate the next ID of your table
- moto : Our Java class we annotated with @Entity is now a table in our database!
Let’s take a look inside this moto table :
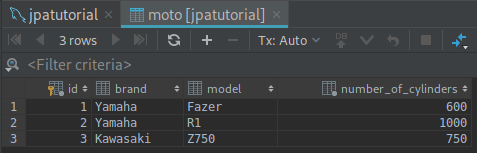
And here we have the data we added in our code. That’s it, we got our data persistence!
Credits
Rubie DE OLIVEIRA (rubie.de-oliveira@epita.fr)
Romain SAUVAIRE--DASSAC (romain.sauvaire-dassac@epita.fr)