This tutorial has been written by Jakub Novak (Linked In ) and reviewed by Thomas Broussard.
This tutorial requires basic Java knowledge, ability to navigate in Eclipse EE IDE and approximately 30 minutes of your time. We are going to walk through everything from setting up the database in Eclipse to creating basic CRUD operations. We are going to focus on methods Create(Student student) and Update(Student student, Student updated). As you might have guessed, we will use dataModel Student. You can find complete code for this tutorial at my github
We will start by creating a new project. Let’s name it fr.epita.tutorial.DAO with 3 packages services, launcher and dataModel. After generating Main in launcher, create class Student in dataModel with 2 attributes Name and SID, which should be enough to identify a student. Generate getters/setters and toString. Auto-generated methods should be enough.
package fr.epita.tutorial.DAO.dataModel;

public class Student {
	private String Name;
	private String SID;

	public String getName() {
		return Name;
	}

	public void setName(String name) {
		Name = name;
	}
	public String getSID() {
		return SID;
	}
	public void setSID(String sID) {
		SID = sID;
	}

	@Override
	public String toString() {
		return "Student [Name=" + Name + ", SID=" + SID + "]";
	}
}
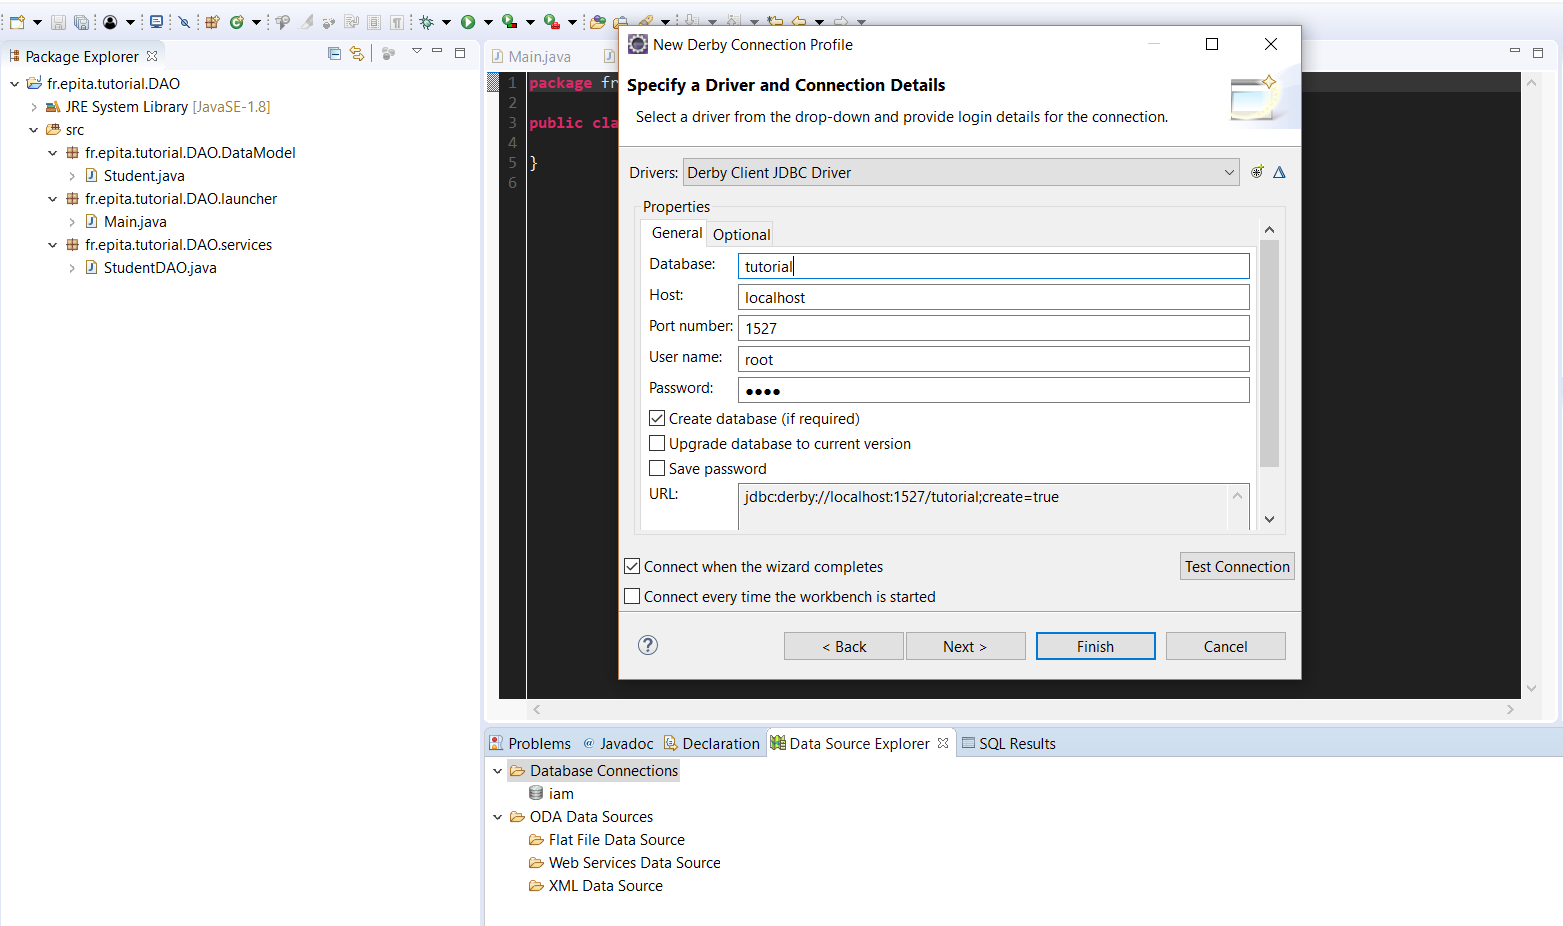
Now that we have our data model, we need to set up a connection to the database, where we will store all the information. Go to Window -> Show View -> Other -> Data Source Explorer, right click on Database Connections and click New. From there, select Derby and create your database. For this tutorial, I’m going to use name tutorial and username/password root, but you are free to use whatever you like. Remember to copy the URL address, we are going to use it later. Now, you have to import the derby library.
Right click on your project on the left, go to properties, Build Path, libraries, add external JAR and search in your Derby/lib folder for derbyclient.jar.
Fig.Derby setup (don’t forget to start your database)
Fig.Adding the derby library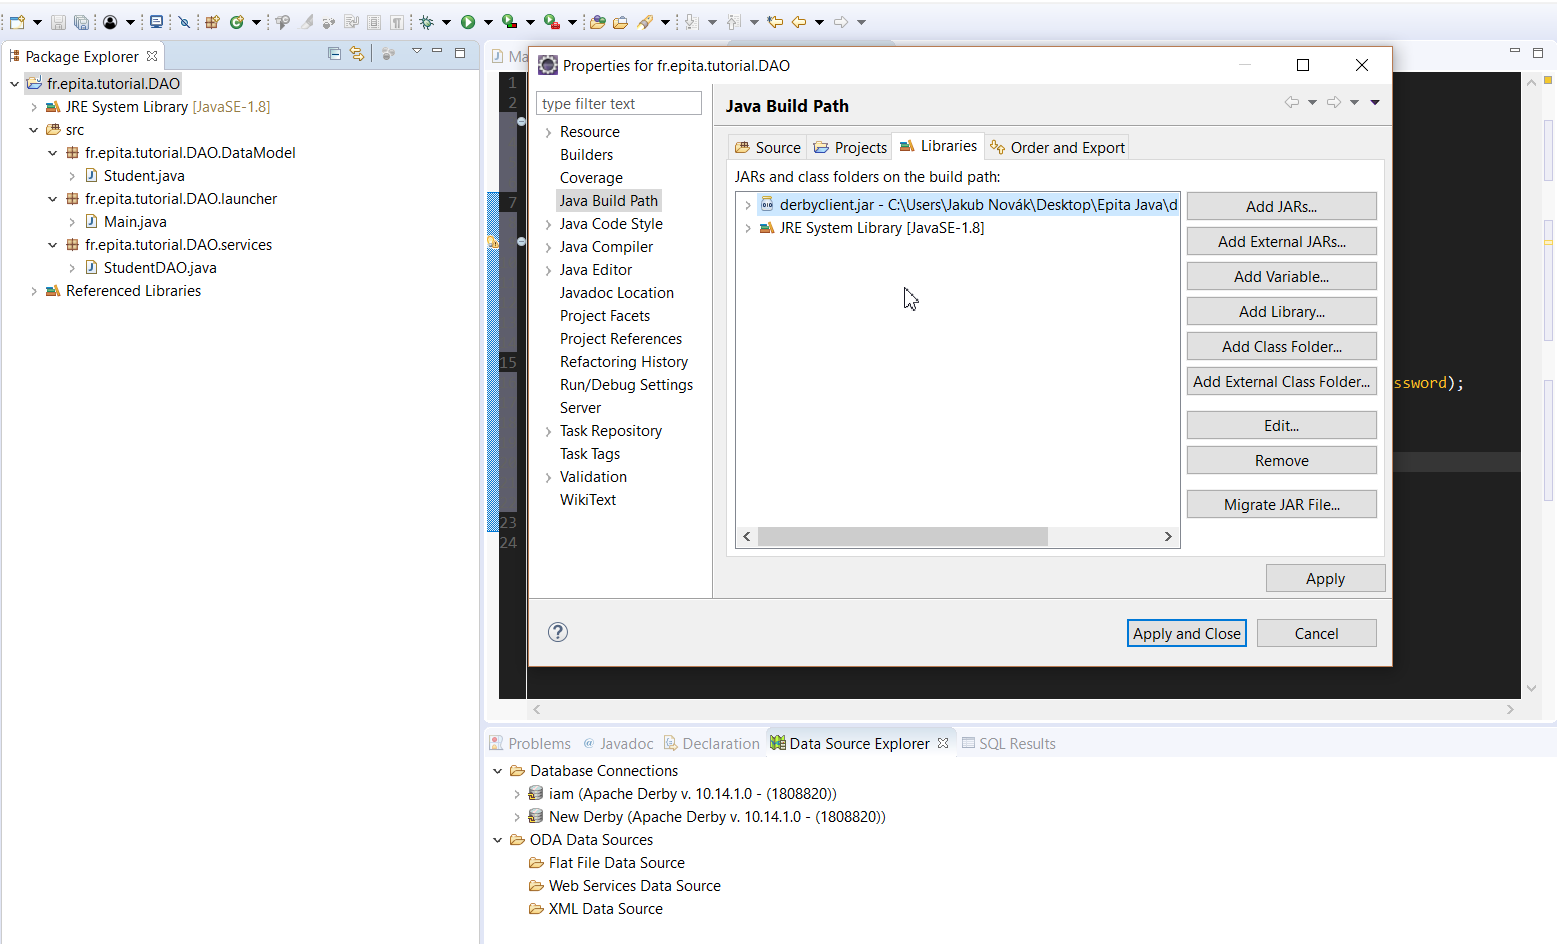
After adding it, you should be able to use the required driver. Connect to your newly created database by running startNetworkServer in bin folder of Derby and right clicking the database it in Data source explorer and clicking connect.
Copy-paste code from my github (capsosk/tutorial) or rewrite it from the screenshot below to create required table in your database. 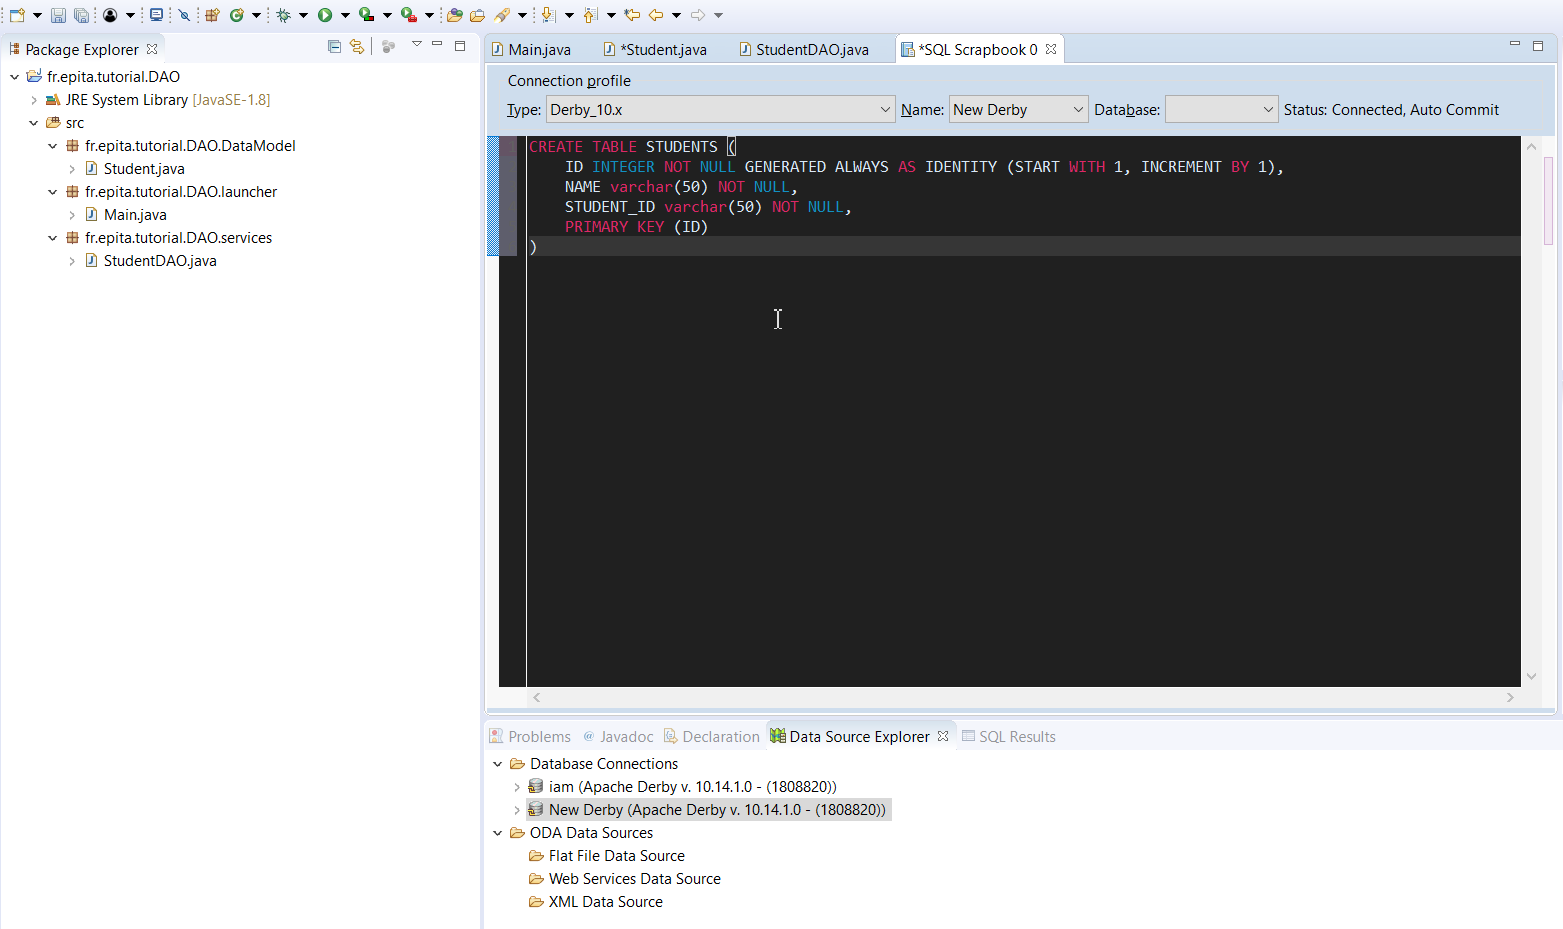
Now we need to create methods to handle the connection and execute the CRUD operations. Create new class StudentDAO in services package and method private Connection getConnection(). We will use this method to create an active connection with the database and will use it in every other DAO method. We are going to use DriverManage.getConnection() which takes 3 arguments database URL, username and password. For convention we will save these into Strings and pass them as arguments. As seen on screenshot below, we need to use Class.forName() to initialize the derby driver class.
You can see what exactly Class.forName() does by checking the Javadoc or stackoverflow.
Our method will return connection. Eclipse will warn you about Exceptions, add all of them to throw declaration and remember to import all required classes.
package fr.epita.tutorial.DAO.services;

import java.sql.Connection;
import java.sql.DriverManager;
import java.sql.PreparedStatement;
import java.sql.SQLException;

import fr.epita.tutorial.DAO.dataModel.Student;
import fr.epita.tutorial.DAO.services.Configurator;
public class StudentDAO {
	//
	private static Connection getConnection() throws ClassNotFoundException, SQLException {

		final String connectionString = Configurator.getInstance().getProperty("db.host");
		final String userName = Configurator.getInstance().getProperty("db.userName");
		final String password = Configurator.getInstance().getProperty("db.password");

		Class.forName("org.apache.derby.jdbc.ClientDriver");

		final Connection connection = DriverManager.getConnection(connectionString, userName, password);
		return connection;
	}
}
We should be able to connect to our database now.
Next part is going to be a bit hard to understand so reading documentation of following methods to understand how they work is suggested.
We will start by creating method public void create(Student student) and creating Connection connection = null; As we are going to use getConnection and it throws 2 exceptions, we will use try-catch approach.
We will try to get a connection by setting connection = getConnection(), then use PreparedStatement for our SQL command "INSERT INTO STUDENTS(NAME, STUDENT_ID) values (?,?) " and then use preparedStatement.getString() to replace two question marks with getters of our passed student argument. Remember that you have to use the getters in order in which you wrote the (NAME, STUDENT_ID) in preparedStatement, so preparedStatement.setString(1, student.getName()) will be for the first. We execute the query by preparedStatement.execute().
Now for the catch part- it will be for ClassNotFoundException | SQLException. For this tutorial, we will simply print out our error. (e.getMesage()).
After catch, if error does not happen, we use finally {} block to close down our connection (we have to use the try-catch for that again).
public void create(Student student) {
		Connection connection = null;
		try {
			connection = getConnection();
			final PreparedStatement preparedStatement = connection.prepareStatement("INSERT INTO STUDENTS(NAME, STUDENT_ID) values (?,?) ");
			preparedStatement.setString(1, student.getName());
			preparedStatement.setString(2, student.getSID());
			preparedStatement.execute();

		} catch (ClassNotFoundException | SQLException e) {
			System.out.println("Exception thrown while creating new Student! : " + e.getMessage());
		} finally {
			try {
				if (connection != null) {
					connection.close();
				}
			} catch (final SQLException e) {
				System.out.println(e.getMessage());
				e.printStackTrace();
			}
		}
	}
Don’t worry, creating update method is going to be much easier, as we are going to copy most of the code. It will take 2 arguments (Student old, Student updated) and will just require more getString methods. We are again replacing question marks with corresponding values. We are going to use the same try-catch phrases as we did in create() method.
Now that we have functioning Create and Update, you should be able to create Search using List and Delete yourself. Try to search for SQL commands online, it shouldn’t be too hard to find them.
public void update(Student old, Student updated) {
		Connection connection = null;
		try {
			connection = getConnection();
			final PreparedStatement preparedStatement = connection.prepareStatement("UPDATE STUDENTS SET NAME = ?,  STUDENT_ID = ? WHERE NAME = ? AND STUDENT_ID = ? ");
			preparedStatement.setString(3, old.getName());
			preparedStatement.setString(4, old.getSID());
			preparedStatement.setString(1, updated.getName());
			preparedStatement.setString(2, updated.getSID());
			preparedStatement.execute();

		} catch (ClassNotFoundException | SQLException e) {
			System.out.println("Exception thrown while updating new Student! : " + e.getMessage());
		} finally {
			try {
				if (connection != null) {
					connection.close();
				}
			} catch (final SQLException e) {
				System.out.println(e.getMessage());
				e.printStackTrace();
			}
		}

	}
Let’s go back to getConnection() method. Don’t you think that it could be easily improved by accepting the URL, username and password as command line arguments? Or even better, just writing them in a file and reading it?
We will create a Configurator class in services, so we don’t have to rewrite out getConnection everytime we change the database. It is very easy to create as the text parsing only requires one line of code.
It will have one attribute, private final Properties properties; and a constructor, where we initialize this class to new Properties(); and use try-catch to load the file.
The properties.load(new FileInputStream(System.getProperty("conf")) will do the trick for us as this loads the «conf» file (we will pass this as VM argument later) and in catch will be IOException with appropriate message. With constructor, we also need to create method getProperty("key") which will take the property after (key) keyword.
package fr.epita.tutorial.DAO.services;

import java.io.FileInputStream;
import java.io.IOException;
import java.util.Properties;

public class Configurator {
	private final Properties properties;

	private static Configurator instance;


	public Configurator() {
		properties = new Properties();
		try {
			properties.load(new FileInputStream(System.getProperty("conf")));
		} catch (final IOException e) {
			System.out.println("error while loading the configurator" + e.getMessage());
		}
	}
	public String getProperty(String key) {

		return properties.getProperty(key);

	}
}
Create new file in your project, I’ll call it tutorial.configuration and write down the required configuration as shown below. Now, we have to replace strings in StudentDAO.getConnection() with configurator attributes.
Now go to Run -> Run Configurations -> Java application -> Variables and add -Dconf=tutorial.configuration or whatever your file is named in VM arguments.
After that, create an instance of configuration in your StudentDAO class and replace written url and username/password with configuration. 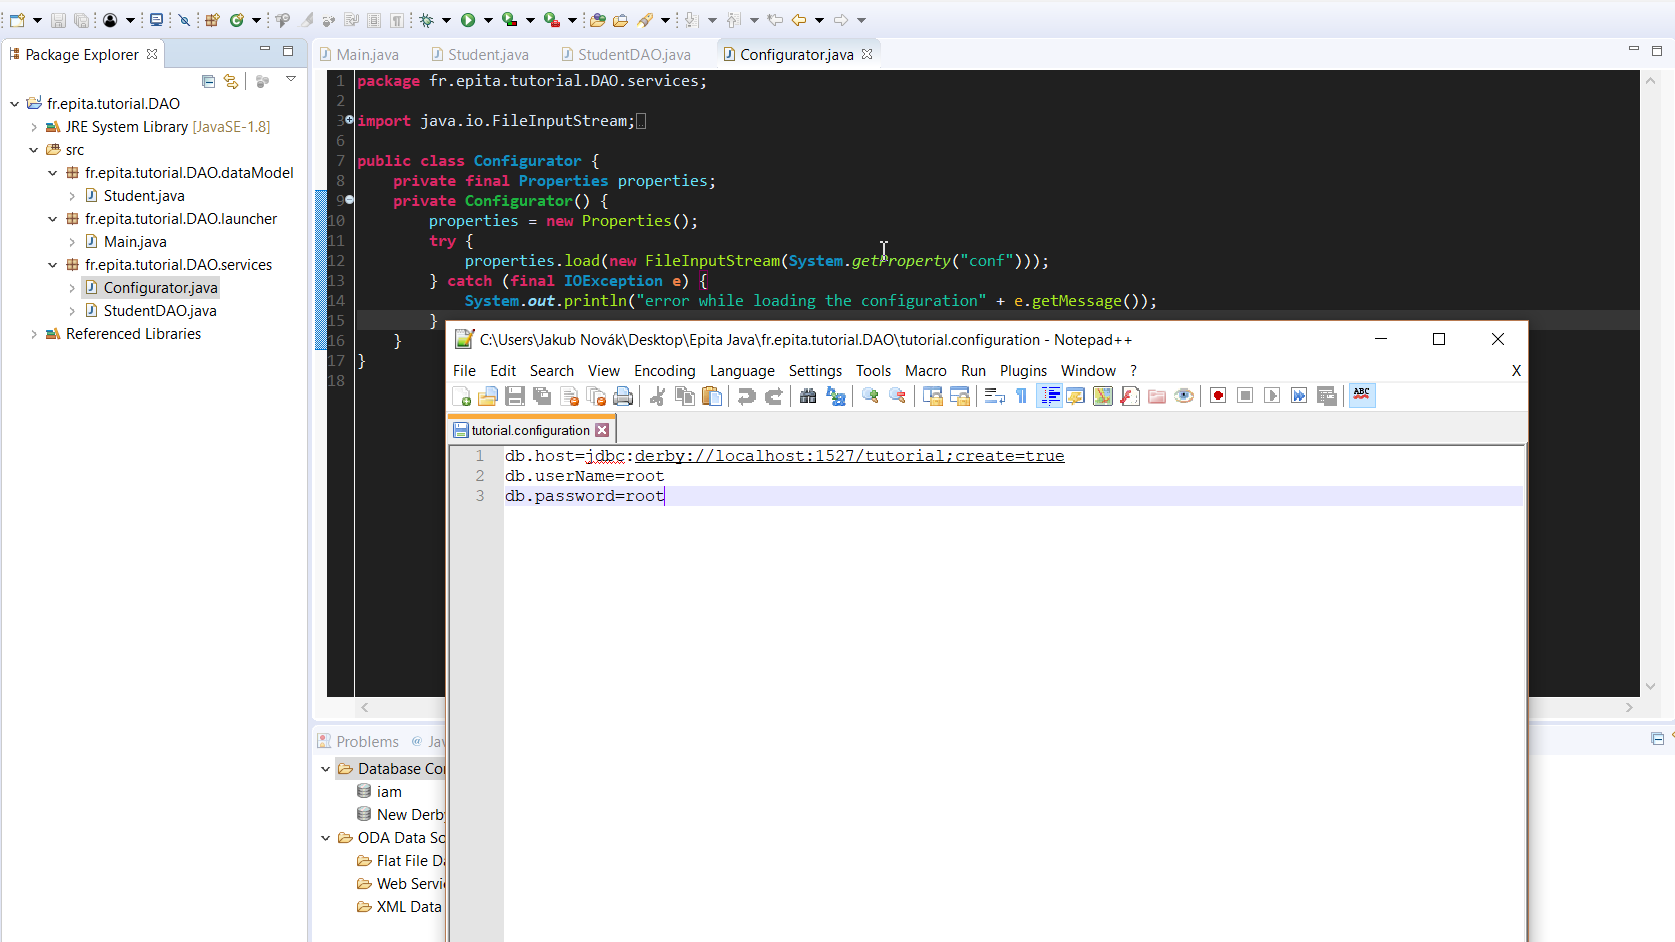
There is however one more problem. Way the configurator works right now, is that it gets called every time we want to add or update something in the database. This is very costly as we have to open and close the file every time. Wouldn’t it be possible to have configurator loaded in the background all the time and only call it when we need it? We can use a pattern called called Singleton. We will try to call for an instance from the getConnection and if there is none, we will create a new one and return it. This means our getInstance() method will have to be static. We also have to change our StudentDAO method so now it takes Configurator.getInstance().getProperty("name of property");. Code is shown below.
package fr.epita.tutorial.DAO.services;

import java.io.FileInputStream;
import java.io.IOException;
import java.util.Properties;

public class Configurator {
	private final Properties properties;

	private static Configurator instance;


	public static Configurator getInstance() {
		if (instance == null) {
			instance = new Configurator();
		}
		return instance;
	}

	private Configurator() {
		properties = new Properties();
		try {
			properties.load(new FileInputStream(System.getProperty("conf")));
		} catch (final IOException e) {
			System.out.println("error while loading the configurator" + e.getMessage());
		}
	}
	public String getProperty(String key) {

		return properties.getProperty(key);

	}
}
Now it is possible to get an instance and some configuration through the following code
final String userName = Configurator.getInstance().getProperty("db.userName");
Now go ahead and try to create a new Student in your main method and add it to the database. We can also add some prints after our create and update methods (for example after the preparedStatement.execute()) so we know exactly what is happening.
I hope you have enjoyed this short tutorial and have fun coding the rest of the CRUD operations!